Bài đăng

SIM800L thực hiện giao thức HTTP GET thông qua lệnh AT Command

Bài viết này Sử dụng mô đun SIM800L thực hiện giao thức HTTP GET thông qua lệnh AT Command được gửi từ máy tính. Đầu tiên bạn cần kết nối Arduino với Mô đun Sim800l và nạp code Serial_Demo như hình bên dưới hoặc xem chi tiết bài: Giao tiếp arduino với sim800h bằng AT command Trong bài viết này sử dụng bo Arduino pro mini 5v AT+CFUN? +CFUN: 1 OK Nếu kết quả ERROR bạn cần kiểm tra thẻ SIM (chú ý hướng gắn SIM) Kiểm tra tín hiệu mạng AT+CSQ +CSQ: 13,0 OK Nếu kết quả là +CSQ: 0,0 , bạn cần kiểm tra lại antena hoặc chọn lại tần số khác bằng lệnh AT+CBAND? Kiểm tra kết nối mạng GPRS AT+CGATT? +CGATT: 1 OK Nếu kết quả trả về là +CGATT: 0 , bạn cần kết nối mạng với lệnh +CGATT=1 Cài đặt GPRS và APN Nếu sử dụng SIM Viettel thì APN là v-connect hoặc e-connect , user "" , mật khẩu "" . AT+SAPBR=3,1,"CONTYPE","GPRS" OK AT+SAPBR=3,1,"APN","e-connect" OK AT+SAPBR=1,1 OK ...
Giao tiếp arduino với sim800h bằng AT command

Bài viết này mô tả giao tiếp arduino mega 2560 với mô đun GSM Sim800H bằng lệnh AT (AT command). Sử dụng mô đun GPRSbee (SIM800H) . Hầu hết các mô đun của SIMCOM đều sử dụng nguồn 3.7 - 4.2V (pin 3.7V Lipo), một số mô đun tích hợp nguồn 5V. Nên khi sử dụng cần lưu ý xem thông tin của mô đun đó. Một số thông số kỹ thuật: - GPRSbee sử dụng chân DTR để bật/tắt nguồn cho mô đun. có thể điều khiển bằng phần mềm (bật =HIGH, tắt=LOW). - Chân CTS là chân báo trạng thái nguồn. - Kết nối UART qua chân DOUT và DIN. Được dùng giao tiếp với Arduino. - Nguồn: pin 3.7V Lipo Sơ đồ kết nối arduino mega với sim800h: Nạp code mẫu. // Set serial for debug console (to the Serial Monitor, speed 115200) #define SerialMon Serial // Set serial for AT commands (to the module) // Use Hardware Serial on Mega, Leonardo, Micro #define SerialAT Serial2 // or Software Serial on Uno, Nano //#include <SoftwareSerial.h> //SoftwareSerial SerialAT(2, 3); // RX, TX void setup() { ...
Python-Flask – Tạo form submit, lưu vào database.

Tạo form với wtf-form. Thao tác trên Database Postgres với SqlAlchemy . 1. Cài đặt Flask . (máy phải cài đặt Python ) 2. Cài đặt PgAdmin trên Window 3. Kết nối Postgres với Python Flask web Trước tiên cài đặt các công cụ sau: Flask-SQLAlchemy (Flask extension that provides SQLAlchemy support), Psycopg2 (a Python adapter for Postgres) $ pip install psycopg2 Flask-SQLAlchemy Trong hello.py # SQL Alchemy from flask_sqlalchemy import SQLAlchemy basedir = os.path.abspath(os.path.dirname( __file__ )) #SQLALchemy app.config[ 'SQLALCHEMY_DATABASE_URI' ] = 'postgresql://< user_name>:<password>@localhost/<database_name>' db = SQLAlchemy(app) Trong đó, khai báo <user_name>, <password>,<database_name> theo đúng cấu hình mà bạn đã cài đặt trong PgAdmin. Khai báo các biến. Trong ví dụ này ta cần ...
Book: MQTT Essentials - A lightweight IoT protocol

Book: MQTT Essentials - A lightweight IoT protocol What You Will Learn Understand how MQTTv3.1 and v3.1.1 works in detail Install and secure a Mosquitto MQTT broker by following best practices Design and develop IoT solutions combined with mobile and web apps that use MQTT messages to communicate Explore the features included in MQTT for IoT and Machine-to-Machine communications Publish and receive MQTT messages with Python, Java, Swift, JavaScript, and Node.js Implement the security best practices while setting up the MQTT Mosquitto broker Source: https:// packtpub .com
Zephyr Project - Hello_World on Arduino due
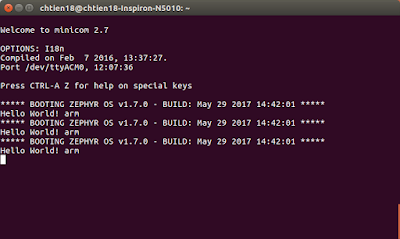
Running Hello_world demo ( based on Zephyr RTOS ) on Arduino Due - Host Computer: Ubuntu 16.04 LTS 64-bit - Device: Arduino Due 1. Setup development environment - Update your OS $ sudo apt-get update $ sudo apt-get upgrade - Install requirements $ sudo apt-get install git make gcc g++ python3-ply ncurses-dev \ python3-yaml python2.7 dfu-util - Install the Zephyr SDK * Download the latest SDK self-extractable binary. $ wget https://github.com/zephyrproject-rtos/meta-zephyr-sdk/releases/download/0.9.1/zephyr-sdk-0.9.1-setup.run * Run the installation binary $ chmod +x zephyr-sdk-0.9.1-setup.run $ ./zephyr-sdk-0.9.1-setup.run * To use the Zephyr SDK, export the following environment variables and use the target location where SDK was installed, type: $ export ZEPHYR_GCC_VARIANT = zephyr $ export ZEPHYR_SDK_INSTALL_DIR = /opt/zephyr-sdk/ 2. Download Zephyr project $ git clone https://github.co...
AgriNode Project: Install Node-RED on Orange Pi
AgriNode Project: Install Node-RED on Orange Pi : Step 1: Install NodeJs v7.x curl -sL http s: // deb .nodesource. com /setup_7. x | sudo -E bash - sudo apt- get install - y nodejs S...
kiem tra 3
https://drive.google.com/open?id=0B4K8lkHvBK58WVFHbEV6TWd0T2s https://drive.google.com/open?id=0B4K8lkHvBK58OXctdVBhSVRFUG8 Excel bai tap 11.3 bai tap 11.4
kiểm tra 2
https://drive.google.com/file/d/0B4K8lkHvBK58eFc2dUx2cWw1NlE/view?usp=sharing https://drive.google.com/file/d/0B4K8lkHvBK58Tms5eFpvWjVEQ28/view?usp=sharing https://drive.google.com/file/d/0B4K8lkHvBK58aEt3VUR6Q3lmWGM/view?usp=sharing
Mẫu luận văn ngành: Tin học ứng dụng
Mẫu luận văn ngành: Tin học ứng dụng Bao gồm mẫu và quy định trình bày luận văn tốt nghiệp ngành Tin học ứng dụng Download: Mẫu luận văn ngành Tin học ứng dụng